
My mom’s birthday was a few months back, however, I wanted to share with you all what I did for her cake this year. She LOVES Tinker Bell. Years ago I had gotten a Tinker Bell cake pan and made her a cake. I decided to try it again for this year too! Here is How to Make a Tinker Bell Cake.
How to Make a Tinker Bell Cake
I always enjoy making a Disney themed cake. Even though I have made this Tinker Bell cake in the past, it was still fun to make it again!

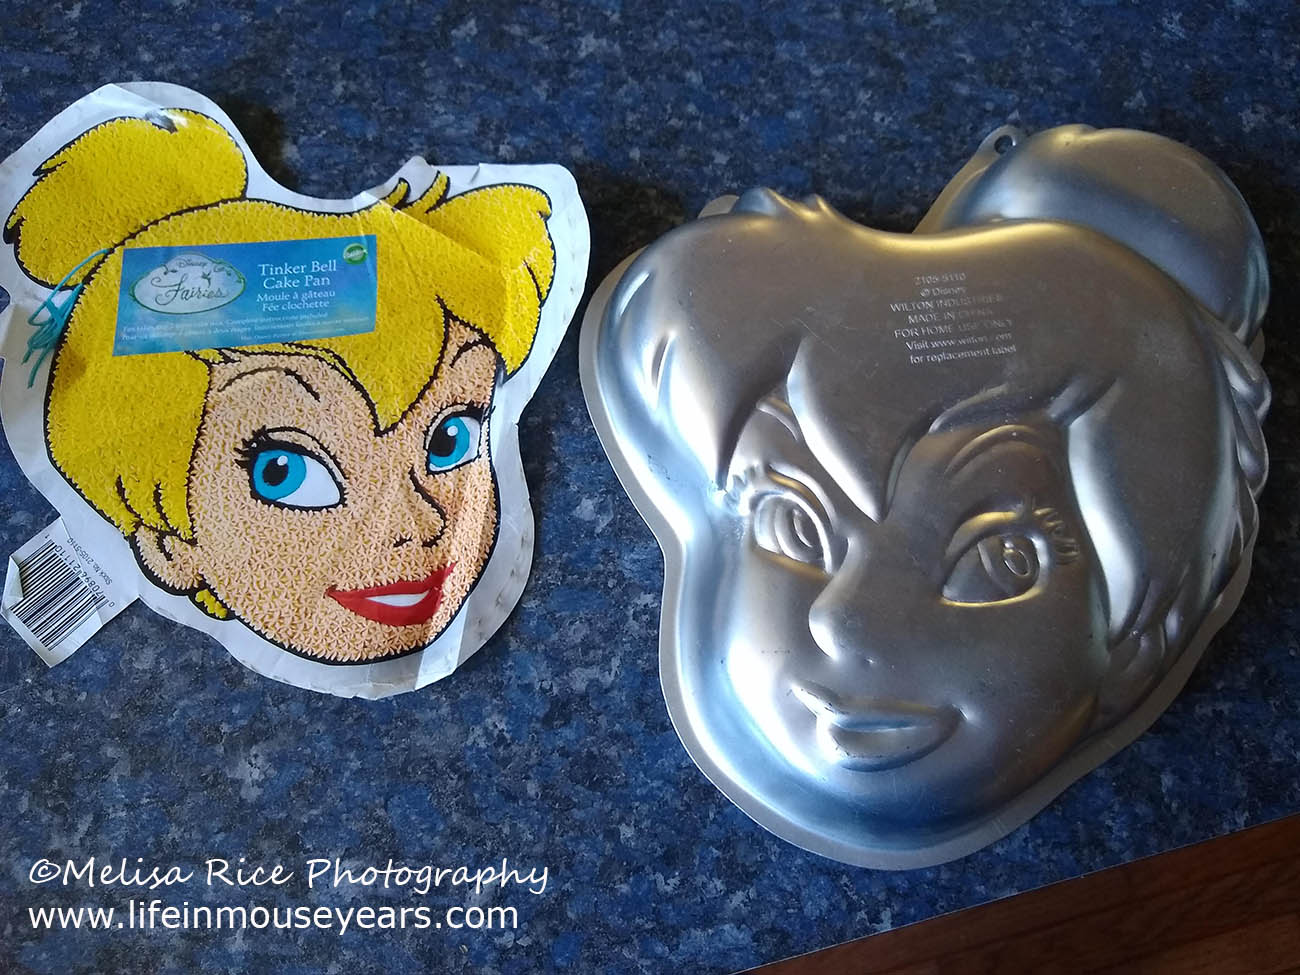
Tinker Bell Shaped Cake Pan
First on How to Make a Tinker Bell Cake is to get a pan. I know that this may be a difficult feat to get this specific pan. Being that it came out years ago, it is not as readily available today. I will share a link to the one on Amazon, however, it is used. That is if it is still available.
I know that you clicked the link and came to this site for Tinker Bell. Although you may not be able to get Tinker Bell, there are other fun-shaped cake pans that you can get. Check out the ones I found below!
Something that you can do to make a Tinkerbell cake without the pan, is to cut the basic shape of Tinker Bell out of cake. Or even make cupcakes and make something similar to a pull-apart cake. Just by having Tinker’s basic shape, you can decorate her face and hair on it.
Supplies
Next on How to Make a Tinker Bell Cake is the supplies. This is what you will need:
For the Cake:
- Cake Pan
- Butter (just enough to line the pan)
- Flour
- Buttermilk
- Olive Oil (light tasting)
- Sugar
- Hershey’s Cocoa
- Baking Powder
- Baking Soda
- Salt
- Eggs
- Vanilla Extract
- Boiling Water
For the Frosting:
- Unsalted Butter
- Powdered Sugar
- Vanilla Extract
- Milk (half n half, whipping cream, or water)
Other:
- Piping Bags
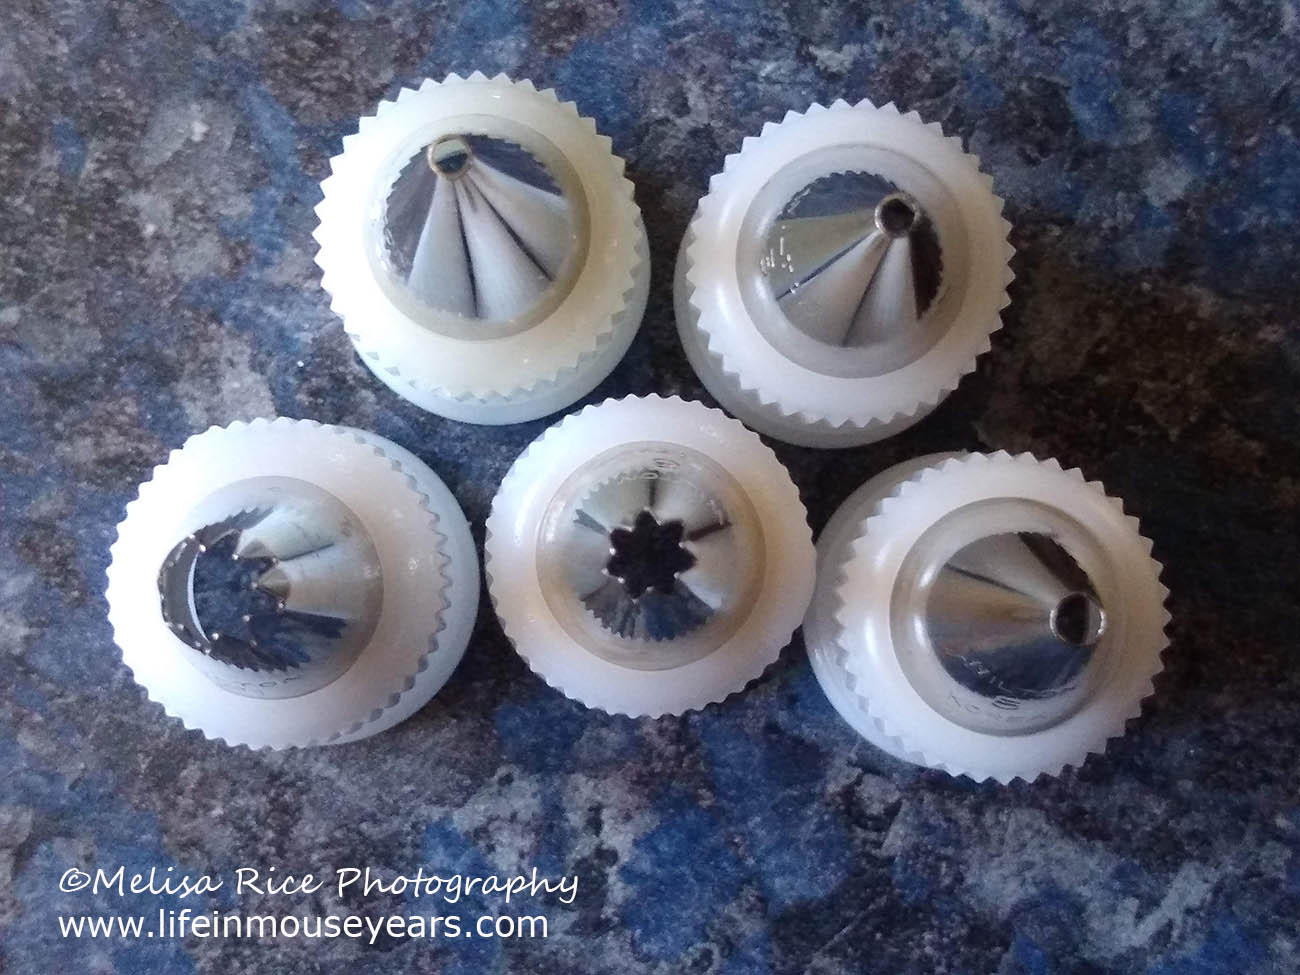
- Tips: #3, #21, #22, #10 (for smaller stars, I recommend replacing the #21 and #22 tips with #16 and #18 tips.
- Small Angled Cake Knife (optional)
- Couplers
- Cake Board
- Kitchen Aid Mixer (Optional but so helpful!)
Best Chocolate Cake Recipe
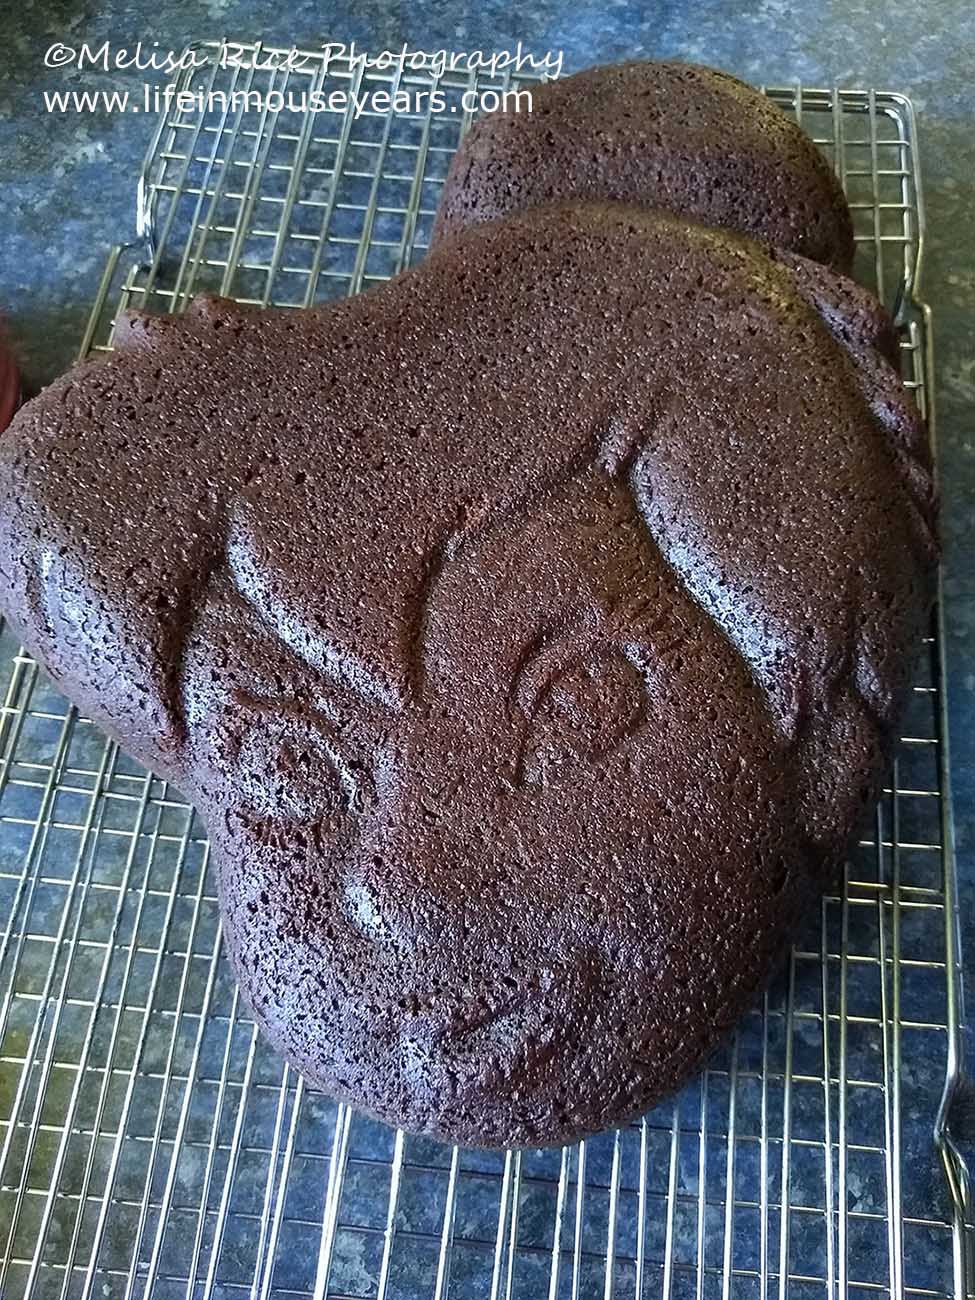
Next on How to Make a Tinker Bell Cake is to bake the cake. My all-time favorite, go-to recipe for chocolate cake is Hershey’s Perfectly Chocolate Cake. The recipe for this cake is on the package of Hershey’s cocoa or it can be found at Hershey’s official site in the link below.
Find the recipe for Hershey’s Perfectly Chocolate Cake here.
This cake is chocolatey, moist, and so delicious!
First, grease and flour the cake pan. I like to mix some flour with some cocoa to flour the pan. This way the edges won’t be all white compared to when you use only flour.
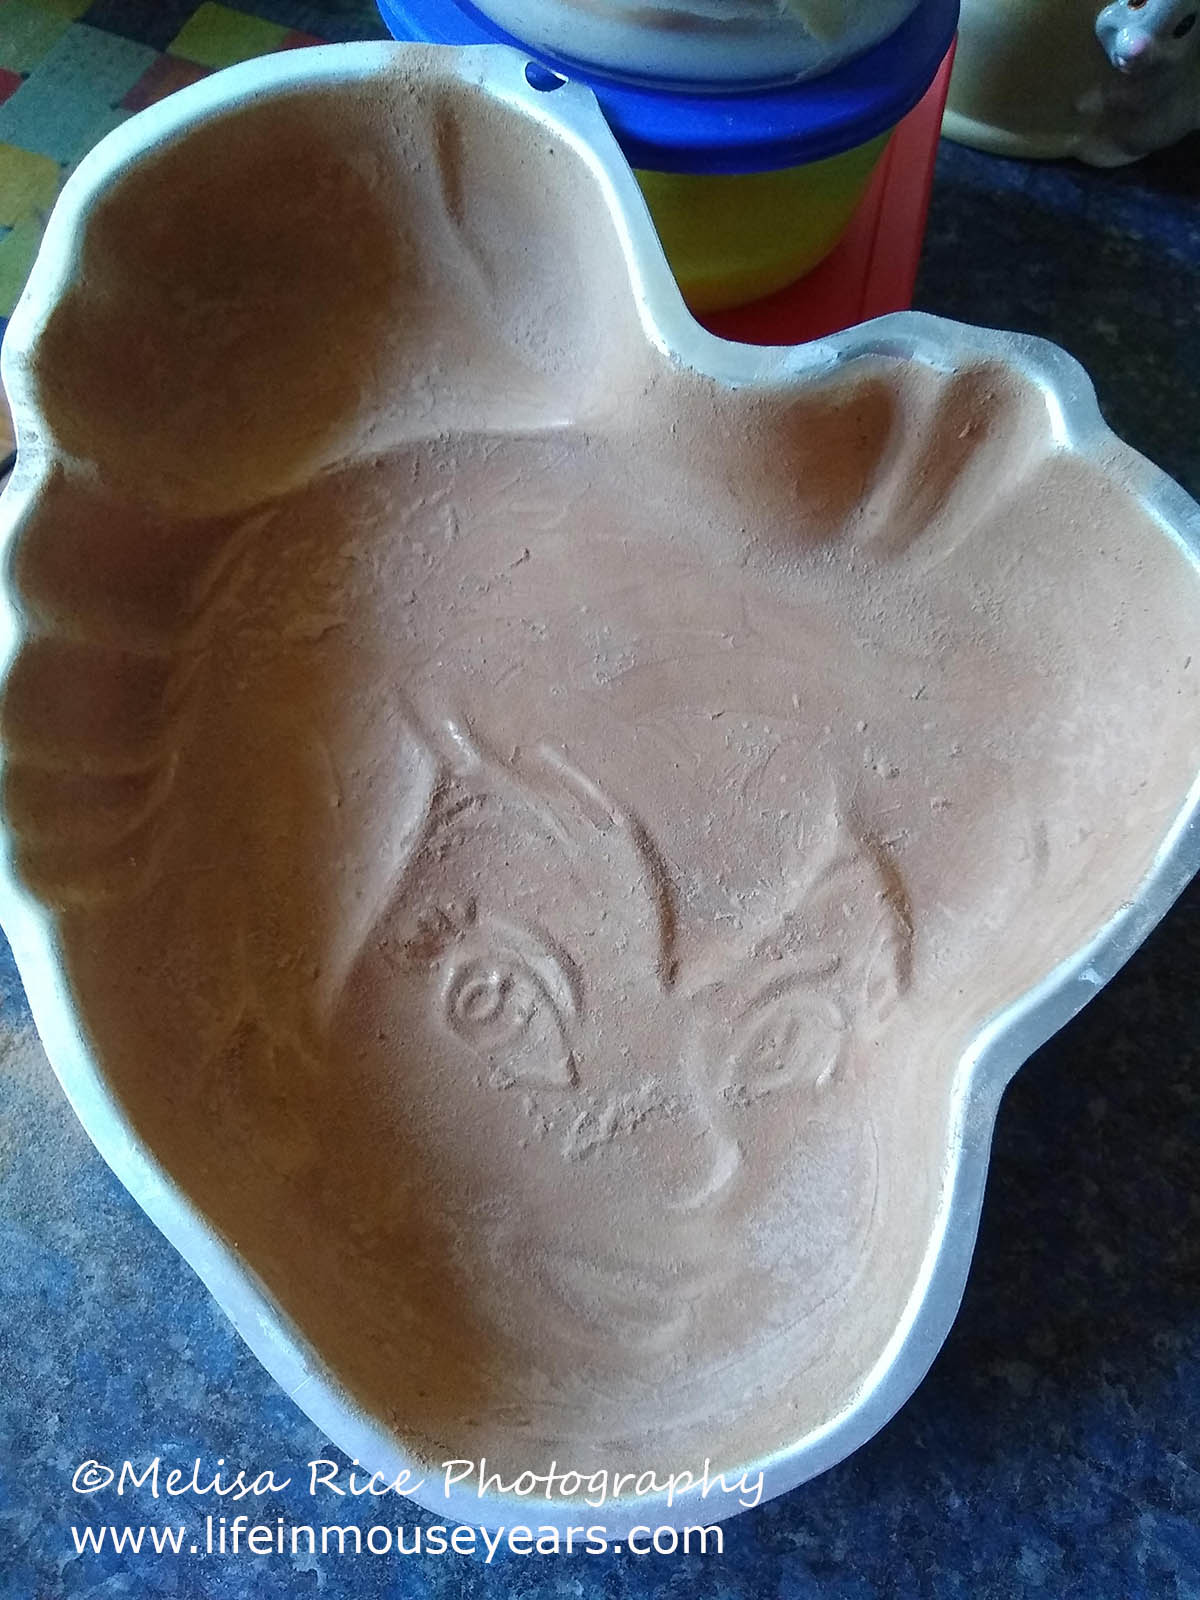
Next, place all of the dry ingredients into a large bowl, then, add in milk, eggs, and vanilla extract and mix. Finally, add in the boiling water and mix. Incidentally, the batter will be very runny, but do not worry! It is supposed to be that way. Pour into the cake pan and put in the oven to bake!
I like to use a wooden toothpick to check the cake for doneness. If the toothpick comes out clean, it is ready to take out and cool.
Buttercream Recipe
Another thing on the list for How to Make a Tinker Bell Cake is the frosting!! Yummy!
My go-to recipe for the icing is Wilton’s Buttercream Recipe. Consequently, I have tried all different types of milk in this recipe. In particular, regular milk, half and half, whipping cream, almond milk, and soy milk! They all turn out, just the consistency might be a little different. Lately, I have been using half and half because that is what I had on hand. I actually really like it for this frosting recipe.
The other thing I like to do with this recipe is to whip the butter before I add other ingredients. It turns out so soft!
To whip the icing, put the butter in the mixer bowl and turn on the mixer to med to med-high speed. Let it go for about 5 mins, scrape the bowl, and start again. Once the butter is a very light yellow and looks fluffy, then you can start to add the powdered sugar and vanilla extract a little at a time.
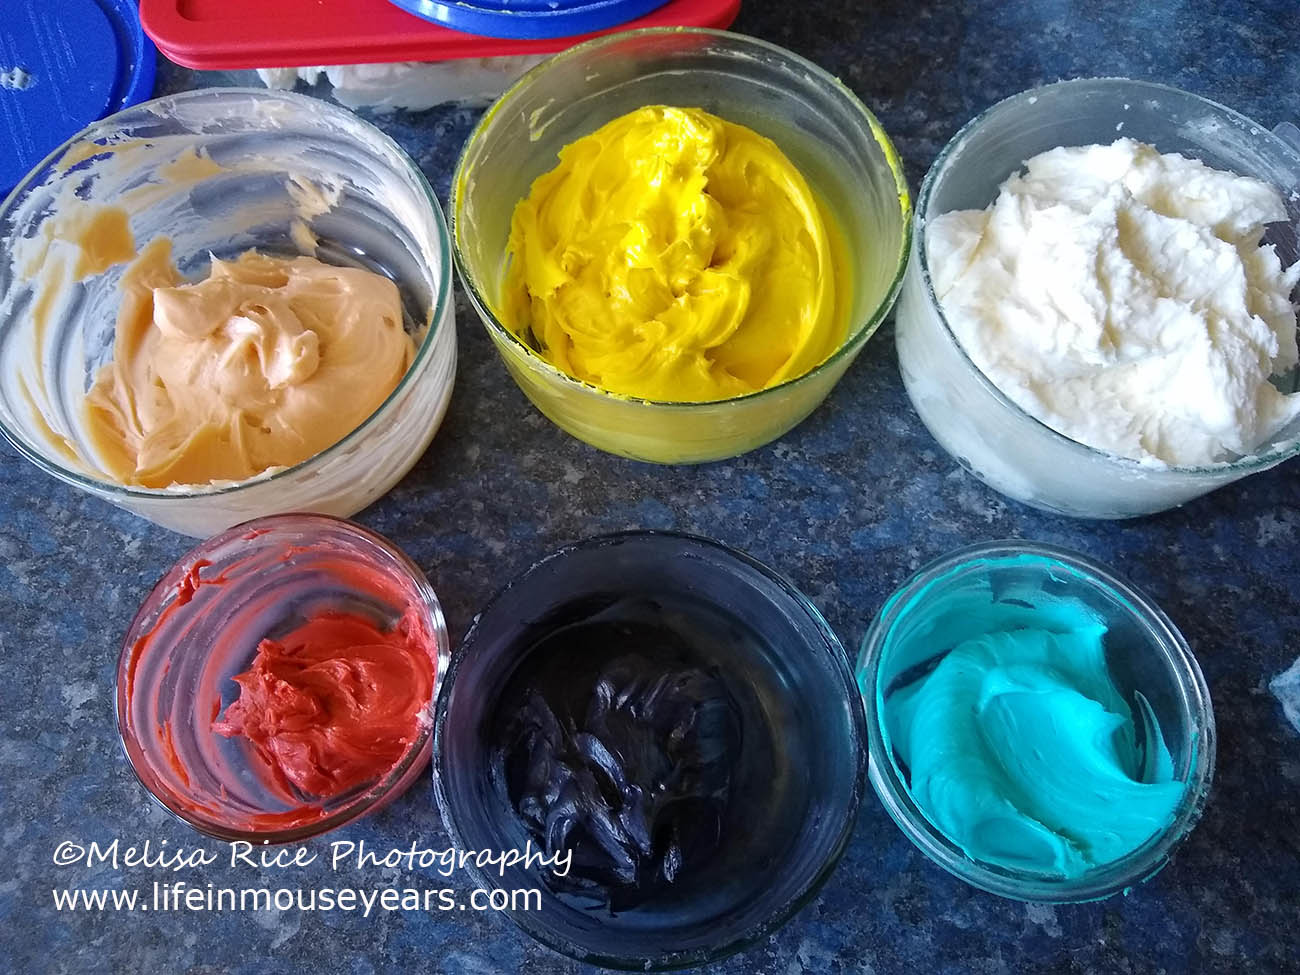
Next, divide the frosting up into bowls and add some gel colors to it. Once you have divided some into smaller bowls, add some gel color for the bowl.
Here are the colors I used for this cake. I used Wilton gel colors: royal blue, lemon yellow, red-red, and copper. In addition to a little bit of white for her eyes, and Wilton Color Right black food gel.
Let the Frosting Begin!
Another thing on the list for How to Make a Tinker Bell Cake is to prepare the frosting piping bags. In this case, I like to use couplers in the piping bags so that I can change out the tips if I need the same tip for multiple colors. As a result, it definitely comes in handy to change out the tips back and forth. For the most part, I have gotten multiples of the same tip so that I do not have to mess with changing and cleaning the tips, however, I do not have multiples of all of them. Yet…
For this cake, it will take six piping bags. One for each color. Place the couplers in the bags and attach the tips. Next, fill the bags with the frosting, matching the tips with the colors you will be using. Consequently, if you do not have enough tips and need to change out tips, the bags can still be filled with frosting ahead of time. Just make sure to not squeeze it all the way to the coupler until the tip is on there. Then you will be ready to go!
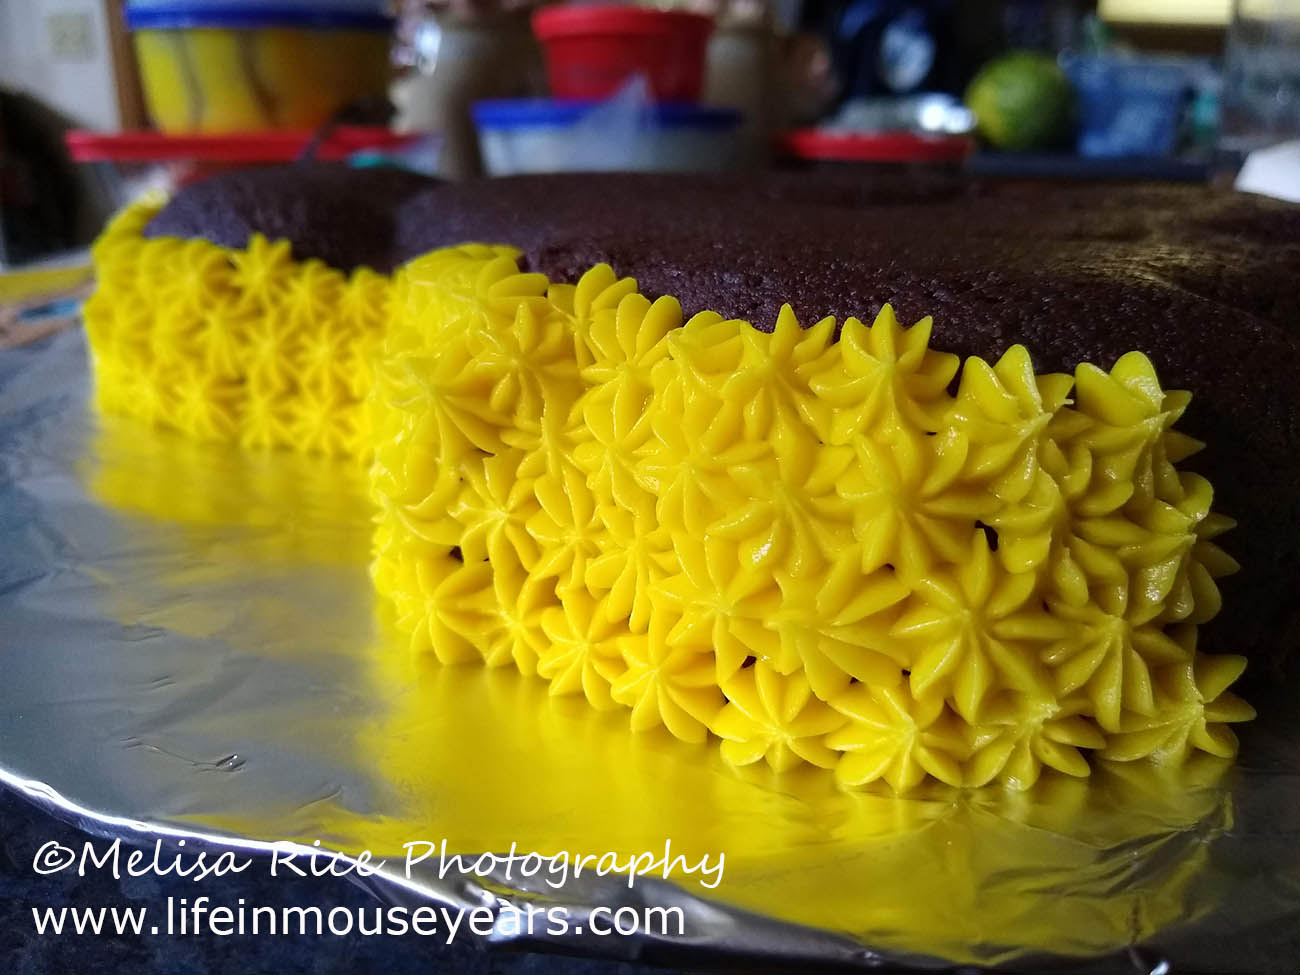
Frost the Edges of the Tinker Bell Cake First
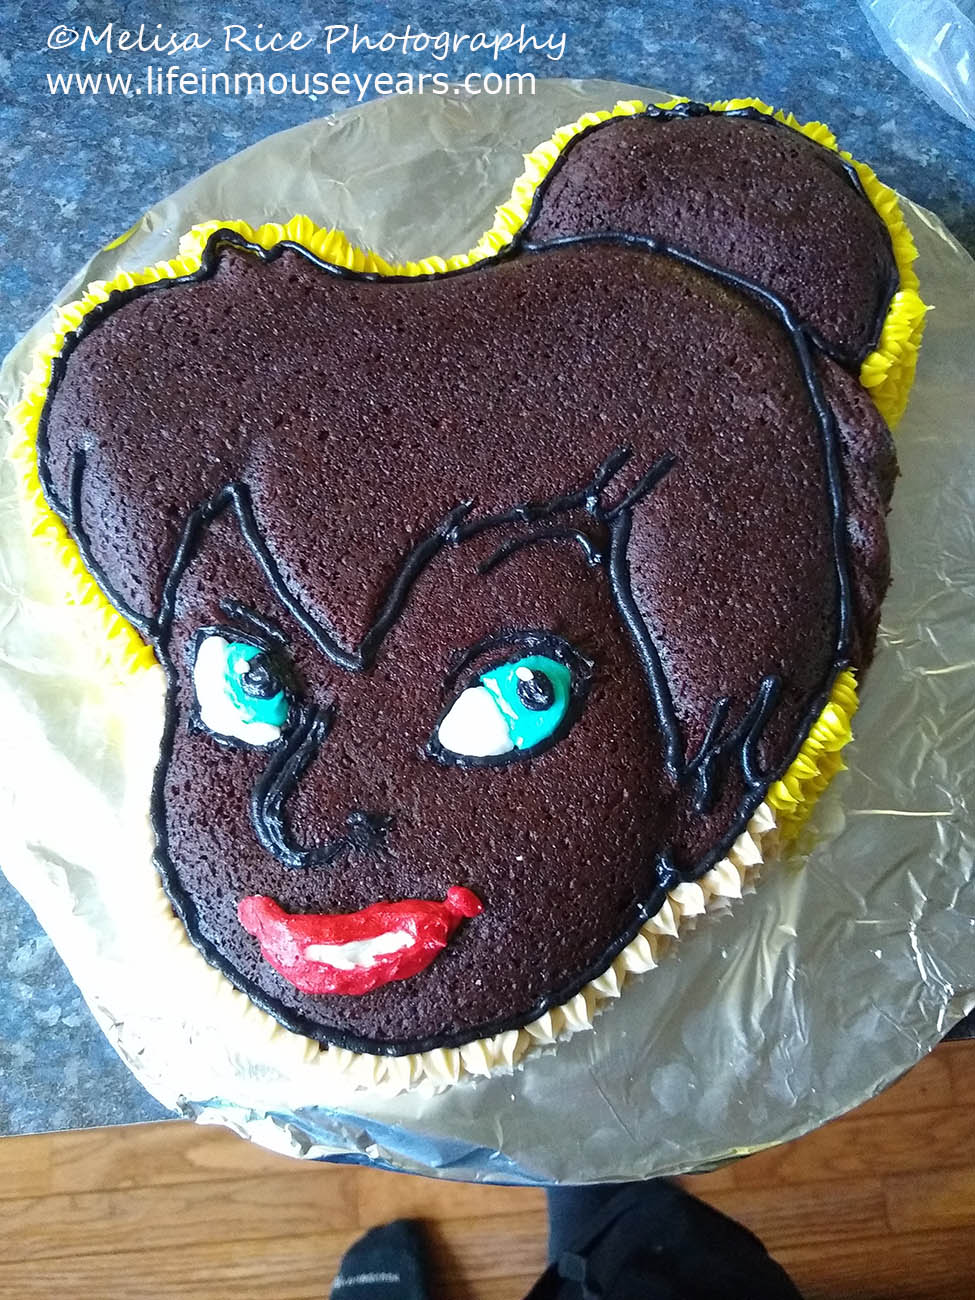
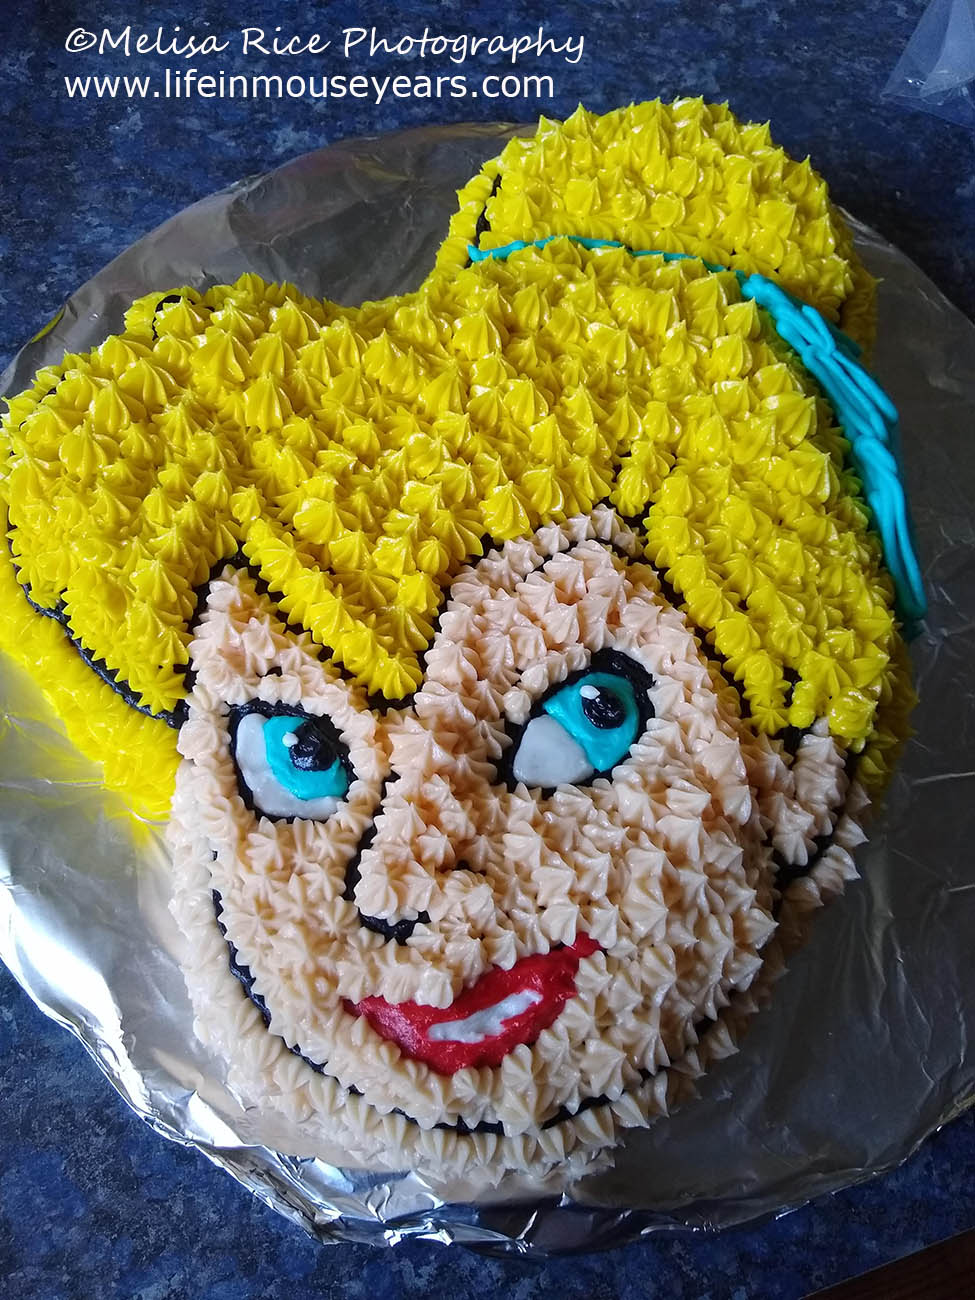
Next on How to Make a Tinker Bell Cake is something I have learned after doing a character shaped cake multiple times. It is to pipe the edges first and to have the edges match the color of the section of the top part of the cake. For Example, with Tinker Bell, the yellow of her hair will go onto the edges of the hair sections. Her face will be the skin tone on the edge there around her face area. Likewise, I also put blue where her hair ribbon is. Similarly, the yellow could probably have worked there in that section as well, but this time I went with blue.
The directions for Tinker Bell, and what I did the first time I made the cake, says to make the edges all white. In addition to about an inch on the cake board with a shell border around it. After doing that and the matching colors, in this case, I have to say, I personally prefer the matching colors as opposed to the white. I think the matching makes it look nicer and more three dimensional. I also did another trick, later on, to help with the three-dimensional look as well.

Outlines
Another step on How to Make a Tinker Bell Cake is to pipe the black outlines on the cake. This is the area around the eyes, her nose, hair, mouth, face, and eyebrows. I almost wonder if the black is a bit too dark, however, I haven’t played around with different colors for the outlines yet.
Ooooo more cake to sample. Bummer. Heehee
Eyes and Mouth
Next on How to Make a Tinker Bell Cake is to pipe and smooth the frosting for Tinker Bells’ eyes. To begin with, I added the white of her eyes and smoothed out the frosting. The directions say to put powdered sugar on your finger and then press it down. I did not have luck with that. It pulled the icing up. I ended up using some milk, just a smidge, to smooth it. Likewise, I have used an angled cake knife to smooth it as well. Less messy on the hands that way.
Then, I added blue to her eyes and smoothed that out. Added a circle of black and a tiny white dot as well.
Tinker Bell’s mouth was next. This is something I struggle with. Trying to get her lips to look realistic and not creepy. I added some white in the center area for her teeth. Next, add the red of her lips and smooth. I did it this way so that the lips can be higher than her teeth. In hopes that it would look more realistic.
Piping Stars on Top of Tinker Bell
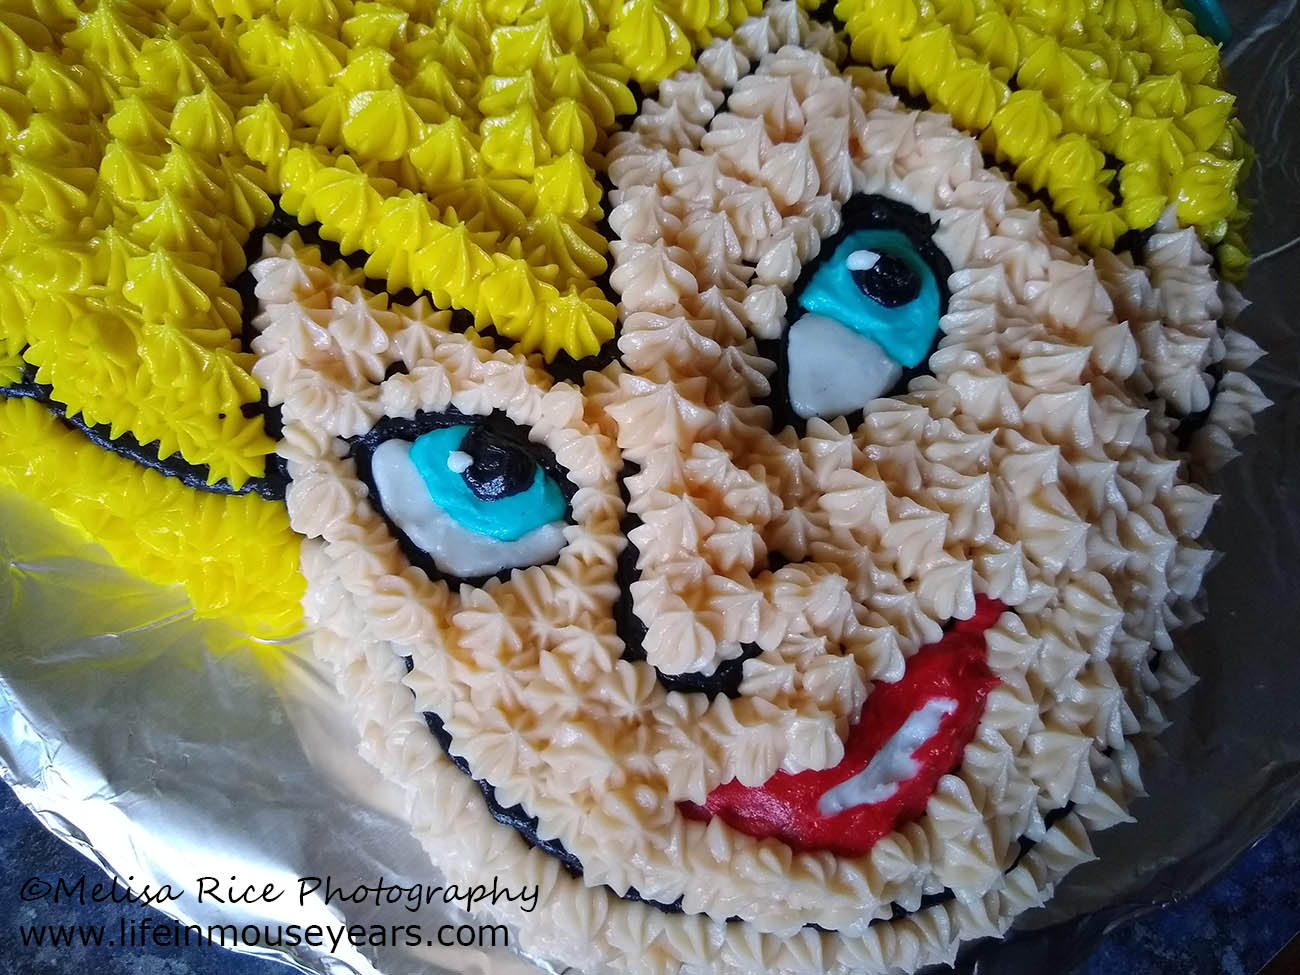
Another step on How to Make a Tinker Bell Cake is to pipe the stars onto Tinker Bell’s hair and face. I started with her face so that I could make her hair go over parts of it. Again, going for a realistic look. Then I did her hair.
The tip I had mentioned above for the three-dimensional look, is to add another layer of stars on top of the first layer. I don’t do this over the entire cake, Just parts of her hair. Kind of the middle and front of her hair. The other spot I did this on the cake was her nose area and cheek. I have such a hard time with her nose too. (Come to think of it, when I try to draw faces I have the same trouble with the nose and mouth as well.)
Add in Birthday Wishes
Finally on the list of How to Make a Tinker Bell Cake is to add in birthday wishes. This cake was for my Mom. I added in Happy at the top of the board and Birthday on the bottom side area. By writing on the cake board, it saves the design of the character cake. Especially since there is no place to write on them.
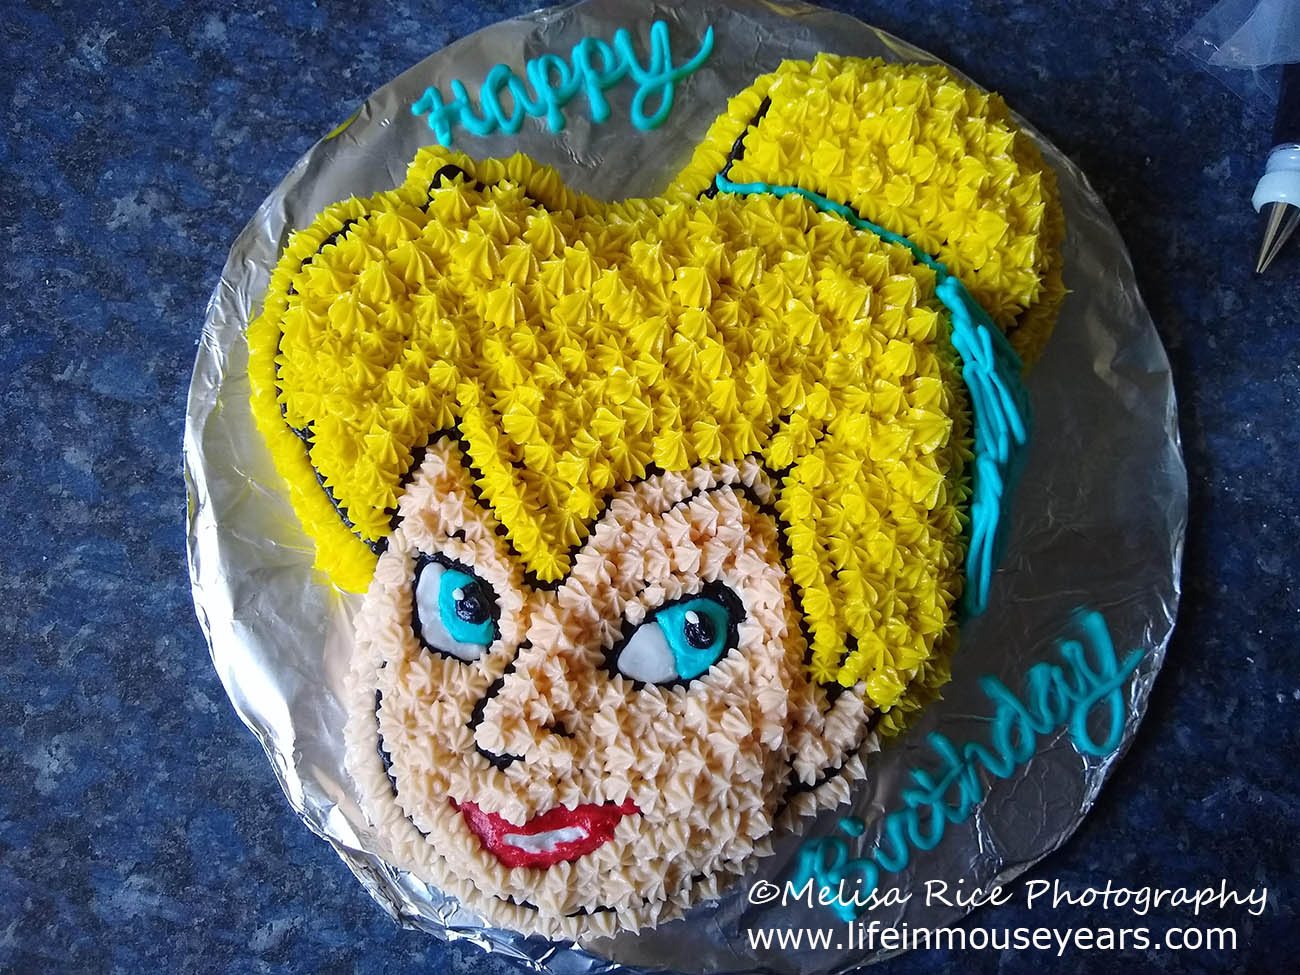
Tip: Sometimes the cake board is plain, with no design. I like to take aluminum foil (or decorative foil) and wrap the cake board. Then it is decorated and it also gives a nice spot to write or add embellishments to the cake.
In Conclusion
I hope that today’s post-How to Make a Tinker Bell Cake helps you to get started on making a cake of your own! And as I have mentioned before, it doesn’t have to be a shaped cake pan that I share here. For the most part, there are a lot of fun character cake pans to choose from!
Questions or Comments?
Do you have any questions or comments on today’s post-How to Make a Tinker Bell Cake? Please feel free to leave them below. We would love to help! Have you made a Disney cake? Therefore, please feel free to share your experience below. I would love to see your creations as well. Happy Baking!
Thanks for stopping by Life in Mouse Years!
If you would like to support this blog to help keep the Disney love going, please check out one of the affiliate links on this page. It takes you to their secure pages to order what you like. I may receive a small percentage to help keep the blogs coming. Thank you for your support!!

Leave a Reply